
How to organize your wedding and portrait photos and client files
You’ve just finished a photo shoot and you get home and download the cards. It was the Jones family. So you create a folder and cleverly title it:
“Jones Family Portrait”
But after a few months go by the Jones’ give you a call and ask if they can get a large canvas.
Exciting!
You go to get the image they requested… and your heart sinks.
Where is it?
Some of your folders have dates. Some of them are names. Some have names first, others have dates first. Some utilize an odd looking system of numbers and letters that seemed like a clever idea at the time; but you forgot about it and now it no longer makes any sense.
Aha! Jones Family.
You’ve found it.
…But wait, there’s only a copy of a contract in this folder and some RAW files. Where did the finished files go?
Time out.
We’ve been there.
Between weddings and portraits, we have photographed literally hundreds of sessions. All of those have resulted in millions of files.
Millions. Of. Files.
How on earth do we keep track of all of that? How does any wedding or portrait photographer keep track of all that? How about keeping our computers running smoothly? What about hard drive space filling up?
I’m going to share the ins and outs of our file management system that can solve all of these problems for you.
First, let’s talk about hard drives
At its core, our setup looks like this:
- Hard Drive #1: Operating System + Applications
- Hard Drive #2: Work in progress
- Hard Drive #3: Backup / Time machine
- Hard Drive #4: Personal / General Files
Yes, we use multiple hard drives. Can you implement most of the file structure recommendations I’m about to outline without multiple hard drives? Yes, you can! So continue reading even if you aren’t ready to add extra hard drives, yet. But if you have paying clients who are depending on you, then I would highly encourage going the multiple drive route as soon as you can.
By the way, I will also show you how we organize our own personal image files — and that will be towards the end.
Hard Drive #1: Operating System + Applications
The primary hard drive that is installed in our computer is reserved for the operating system itself and our Applications. And that’s pretty much it. Seriously. OS X and our programs. (I hear rumors that some photographers use Windows. I suppose that would be all right as well… if you’re into that sort of thing). Ideally, this is a solid state (SSD) drive because that will speed up running your software more than most other things you can do.
Hard drives crash, and often times that is your primary operating system drive. If and when that happens, you don’t want to have to deal with recovering and fixing everything to try and retrieve your images and client files from that drive before you’re able to get any more work done, or deliver something a client needs.
Hard Drive #2: Work in progress
We abbreviate this as “WIP”. Every shoot we’re currently working on goes in here, and nothing else. This is where all the important stuff happens.
For each shoot we complete, we create a folder and name it like this:
YYMMDD – Names – Shoot Type
Using the year first means that they will always show up ordered by date, when you are sorting files by name.
Here’s a screen shot of the inside of my WIP drive, right now.
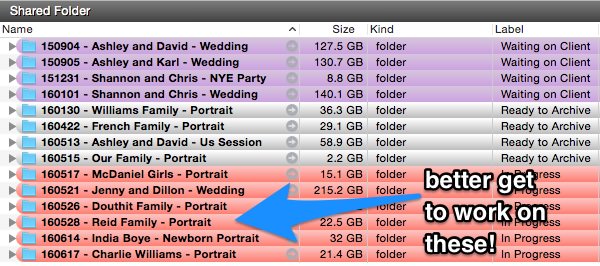
Wow! Look how colorful it is in there.
Let’s talk about that, now.
If you’re using OS X, you can set up your folder labels/colors by opening up a finder window, and then clicking > Finder > Preferences > Labels
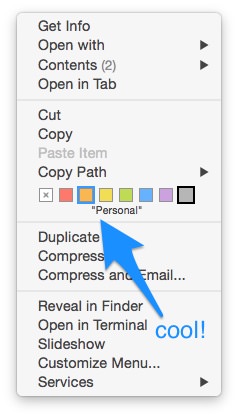
That will bring up this window:

You can see we’ve customized the titles of each color, here. (Been doing this for years and still haven’t thought of need for yellow, yet…)
When you’re in finder, you can right click and set the label, there. Each color will display your custom title below it, which is useful when you’re first using this feature and don’t already know what you use each color for.
When we switched from Windows to OS X, Windows didn’t have this feature built in. I just did a quick search and it looks like Windows still doesn’t offer this feature; however, there are some third party programs that will add the functionality. I can’t personally recommend any of these because I’ve never used them; but here are some program names that came up when I searched for that feature: Folderico, Folder Marker, Rainbow Folders, LabelsWin, and Xentient Labels, TrioX)
Red: In Progress. These are shoots we’re still actively working on.
Orange: Personal. These are our own personal shoots, or tests or even a quick shoot for friends or family where we don’t have clients waiting on us for anything; but it’s not complete.
Yellow: Hmmm. What could I use this for?
Green: Need to order / Requires attention. Green. Like money. You know. Because we got paid and need to order something. An album, prints, wall art, etc. I also label green if there’s another general task that I need to do here; but it’s after the session has been delivered or presented to our clients.
Blue: Ready for Premiere. This is done and ready to present! But hasn’t been presented, yet. Get that on the calendar and make it happen!
Purple: Waiting on client. Most often this is where people need to get back with us to make album changes or give us some sort of information to complete their order; but we’re waiting on them…
Grey: Ready to Archive. These have already been backed up online and the jpegs stored in long-term storage on both of our computers. Let’s move this off of the WIP drive and onto a drive that goes in the giant hard drive stack!
Ok, let’s take a look inside one of these folders.
Inside a shoot folder
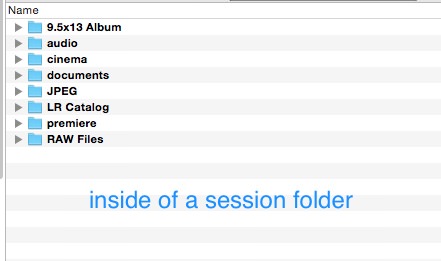
9.5×13 Album – This contains the album design files. I always put the size of the album in the folder names because we order many different sizes, and I don’t want to have to open an image and look at the dimension details to determine what size it is before I go to have it printed. I have a sub folder in here once I output the final flattened JPEG images for print. This sub folder is cleverly titled “PRINT”
Audio – sometimes we record audio of speeches to use in slideshows, or for something else. If we do that, those files go here.
Cinema – sometimes we’ll record a few seconds of video here and there to use in a slideshow. Those files go here.
Documents – Any documents related to this shoot. Contracts, agreements, pre-planning notes, questionnaires, etc.
JPEG – this is the finished hi-resolution JPEG images
LR Catalog – this is the Lightroom catalog for the session. We do (and you should, too!) create a separate Lightroom catalog for every single session. This not only greatly speeds up your computer; but also makes it so when you archive this entire folder, you won’t end up with missing links/files in your Lightroom catalog if you just had one big one stored on your primary hard drive.
Premiere – These are all the files we use for our client premieres. We make a nice keynote presentation and have finished slideshow movie files in here, for example.
RAW Files – This is where we initially download all of the RAW Files directly from our cards after a shoot. We then narrow these files down, and put the keeper files into a sub folder inside of this one, called RAW Keep. We don’t create a Lightroom catalog until the files we actually want to work on have been moved into the RAW Keep folder.
Whatever – Anything else you want can go in here that you think you may need. Just create a folder for all the major categories of items you may want.
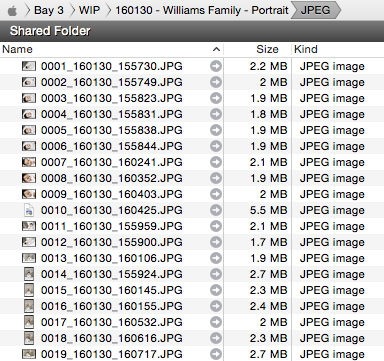
Bonus Tip: How we name our image files
We rename our images as they are downloaded from our cards (using Photo Mechanic). This ensures that every single one of our images has a unique file name. This is very helpful in locating specific images later, and also very helpful in making sure you don’t accidentally overwrite an image with another that has the same file name. I remember sometimes doing searches and finding dozens of images that were all named something like IMG0012.jpg.
Not. Helpful.
Here is the file naming structure we use:
YYMMDD_HHMMSS
That’s year, month, day, hour, minute, second. Photo Mechanic also has built in features to either append letters (or add sub seconds if you prefer) for those times when you take more than one image in a single second, which would otherwise result in a duplicate filename for all images taken during that second.
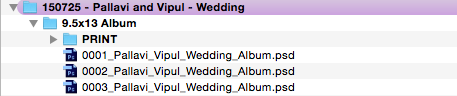
After we are finished with the images, we then do one last batch rename, where we prepend a four digit number that’s easier for us to keep track of with our clients.
0001_YYMMDD_HHMMSS
It looks like this:
Hard Drive #3 – Backup / Time Machine
We use Time Machine (built into OS X) to automatically create real-time backups of everything we do. A quick search informs me that Windows has added a similar feature called File History.
Top priority here is to configure it to automatically back up your WIP files. This way, if you lose any files, delete anything, make a mistake while you’re working, your WIP drive starts going bad… you can almost instantly restore a previous version by opening up Time Machine and hitting the restore button.
If you get a large enough hard drive for this, you can also have it create a backup of your operating system drive (Hard Drive #1).
If you’re also backing up the operating system drive, if that goes bad, you can install a new blank drive and just restore the Time Machine backup of your entire operating system to the new drive and you’ll be back up and running as if nothing ever happened.
If your backup drive isn’t large enough, definitely choose to backup your WIP drive first. That is an absolute must when dealing with work for paying clients. Backing up your operating system drive is nice and can save you some time if that drive goes bad – but worst case scenario, you can just start over and re-install all of your applications and you’ll just be out a few hours as opposed to being out a lot of money because you got yourself sued for losing irreplaceable wedding images.
Hard Drive #4: Personal + General
This is where we keep everything that isn’t the operating system and applications; but also isn’t what we’re currently working on for clients. We keep our Dropbox and Google Drive folders on this drive, and then a lot of general files to run our business. Website files, logos, images, etc. Etc.
Now you might be wondering, “but what about my personal files?” Those end up here as well.
Most personal files aren’t associated with a particular event. They’re just random, everyday photos so its hard to organize them in the same way you would your sessions and weddings.
For our personal files, anything we want to keep/convert from RAW, we store on both of our computers in identical folders. The non-keepers/RAW Files go into storage on those same hard drives as everything else. Highlights from each year are backed up online. Here’s what the file structure looks like:
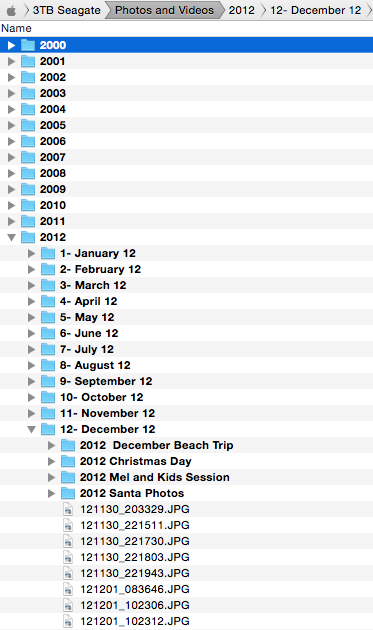
We have a folder for each year, and within each year there is a folder for each month, and a folder for all of the video files from the whole year.
If you have an event you want to separate out or be able to search for by name, you can label that within the month folder.
This keeps our personal files from being a big jumbled mess and makes everything fairly easy to find when we want it.
Hard Drive #5: Media
Bonus hard drive! We keep all of our music and movies, here. For most people, just having a media folder on the general drive would probably be fine; but it turns out we have a significant amount of media files, and it needs its own place to live.
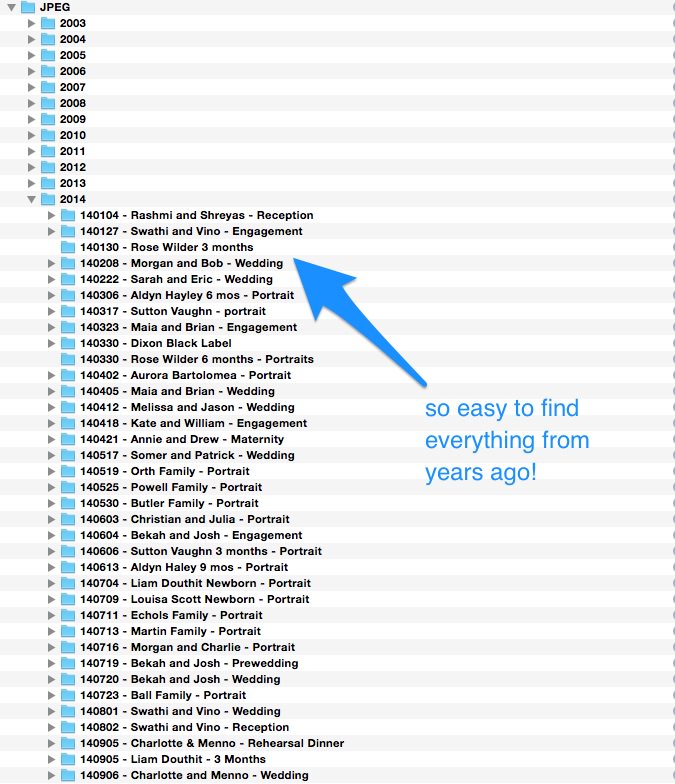
The JPEG Master Folder
After we’re finished with a session and it has been delivered, I copy the JPEG images to a JPEG master folder that has every shoot in it we’ve ever done. I keep this on the general drive (Hard Drive #4). The file structure looks like this:
Hard Drive 4 > McLellan Style > JPEG > YEAR > Shoot Folder
And the shoot folder name is copied/pasted exactly how we do it for the full shoot folders (YYMMDD – Name(s) – Shoot Type) – but inside is only the final print JPEG images and that’s it.
This makes it much, much faster to locate old images if a client needs a print, or if you want to update your website portfolio, etc. without having to get out all your old hard drives and find older images.
Let’s take a look inside of the JPEG master folder.
Archive It
Then I move the entire master shoot folder onto an additional external hard drive (Hard Drive #6, 7, 8, 9, etc.!) that is only for archived/inactive sessions. I keep moving shoots onto this drive until it’s full.
Once it is full, I do a screen capture of the contents of the drive. I used to print it out and tape that onto the top of the drive so I could just physically look at hard drives to know what’s on them. But file sizes continue to get larger and larger, and we have a ton of drives now. Seriously, I just counted the hard drives that are sitting within 3 feet of me right now, and there are about a dozen drives totaling over 40 terabytes.
This year I started saving the screen capture into a folder that I keep on my desktop. I name each screen capture the name of the hard drive (And I append letters if the file list is long enough that it requires multiple screen captures). I name them sequentially like this: SIZE – Brand – Number. For example: 3TB Seagate IV.
Here is an example of that in practice:
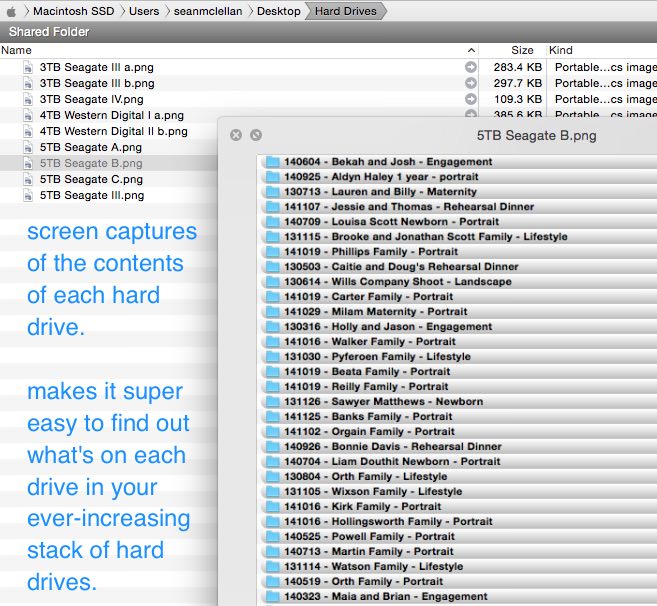
Yes, it bothers me too that I apparently forgot to sort these by name before taking this screen capture.
Deep breath.
Move onward, and spend less time searching for images and more time having fun
I hope that is helpful to you and your days of stressing out over wondering where images went are long gone. Please feel free to completely duplicate our file structure organization, or modify it to fit how you do things. If you make improvements, please share them with us!
— Sean
I would a post or some info on sharing the images with your clients. I do discs for most but what happens when they don’t have a cd drive like most IMac computers now?
Hey Jackie! We used to do discs before they started being phased out. We now use a combination of direct digital downloads and USB drives.
For direct digital downloads, we have put all the files in a .zip file before, which we email to them. Or we have put it in Dropbox and shared a link with them that way.
Our current gallery system (Zenfolio) allows you to enable hi-resolution digital downloads with a password. That’s usually the method we use, now.
When we use USB drives, I like the ones that are the size/shape of a credit card. They look and feel nice, and are different from the usual small ones that are all over the place, now.
PASS is a product that allows for digital downloading, and has some other capabilities built in as well. That product isn’t a good fit for our business; but I have heard many sing its praises, and it may be a good fit for you :)
Hope that helps!
Thanks for reading, Jackie!
I just have to say THANK YOU SO MUCH for this post! I’ve been researching all day on workflow/back up systems. I don’t have a ton of weddings per year as of yet, so now is better than ever to get my backup routine down. This blog post helped me SO much! What do you use for backing up your photos online for storage? Also, have you found a brand of external hard drives that you prefer most?
Thank you!
Val :)
Hey Valerie!
You’re welcome — thank you so much for the kind words, and we’re thrilled this was helpful for you!
We back up our images online using Zenfolio, which also doubles as our client gallery and print ordering system.
And brand of hard drives? We use Western Digital and Seagate drives.
If you’re into this sort of thing, here’s a link to a study Backblaze did last year (2015) that shows their reliability rates over testing 47,561 hard drives in their datacenter: https://www.backblaze.com/blog/hard-drive-reliability-stats-for-q2-2015/
Thank you for this post, I really like how you broke it down into multiple working external hard drives. My question is, do you have a folder somewhere on one of the drives of your favorite portfoilio worthy images that you save right away, as to make marketing material from down the road? I’m struggling going years back to look for a photo that will work for ‘that’ ad campaign and am going nuts.